Final Fantasy XIV (or FFXIV for short) is one of my favorite video games. I thought I could share the basics of how I've set up my HUD, my controls, and my macros. Please note this post contains one screenshot from Anabaseios: The Twelft Circle (Savage) part 2, so please consider yourself warned, spoiler-wise.
My basic HUD looks like this.
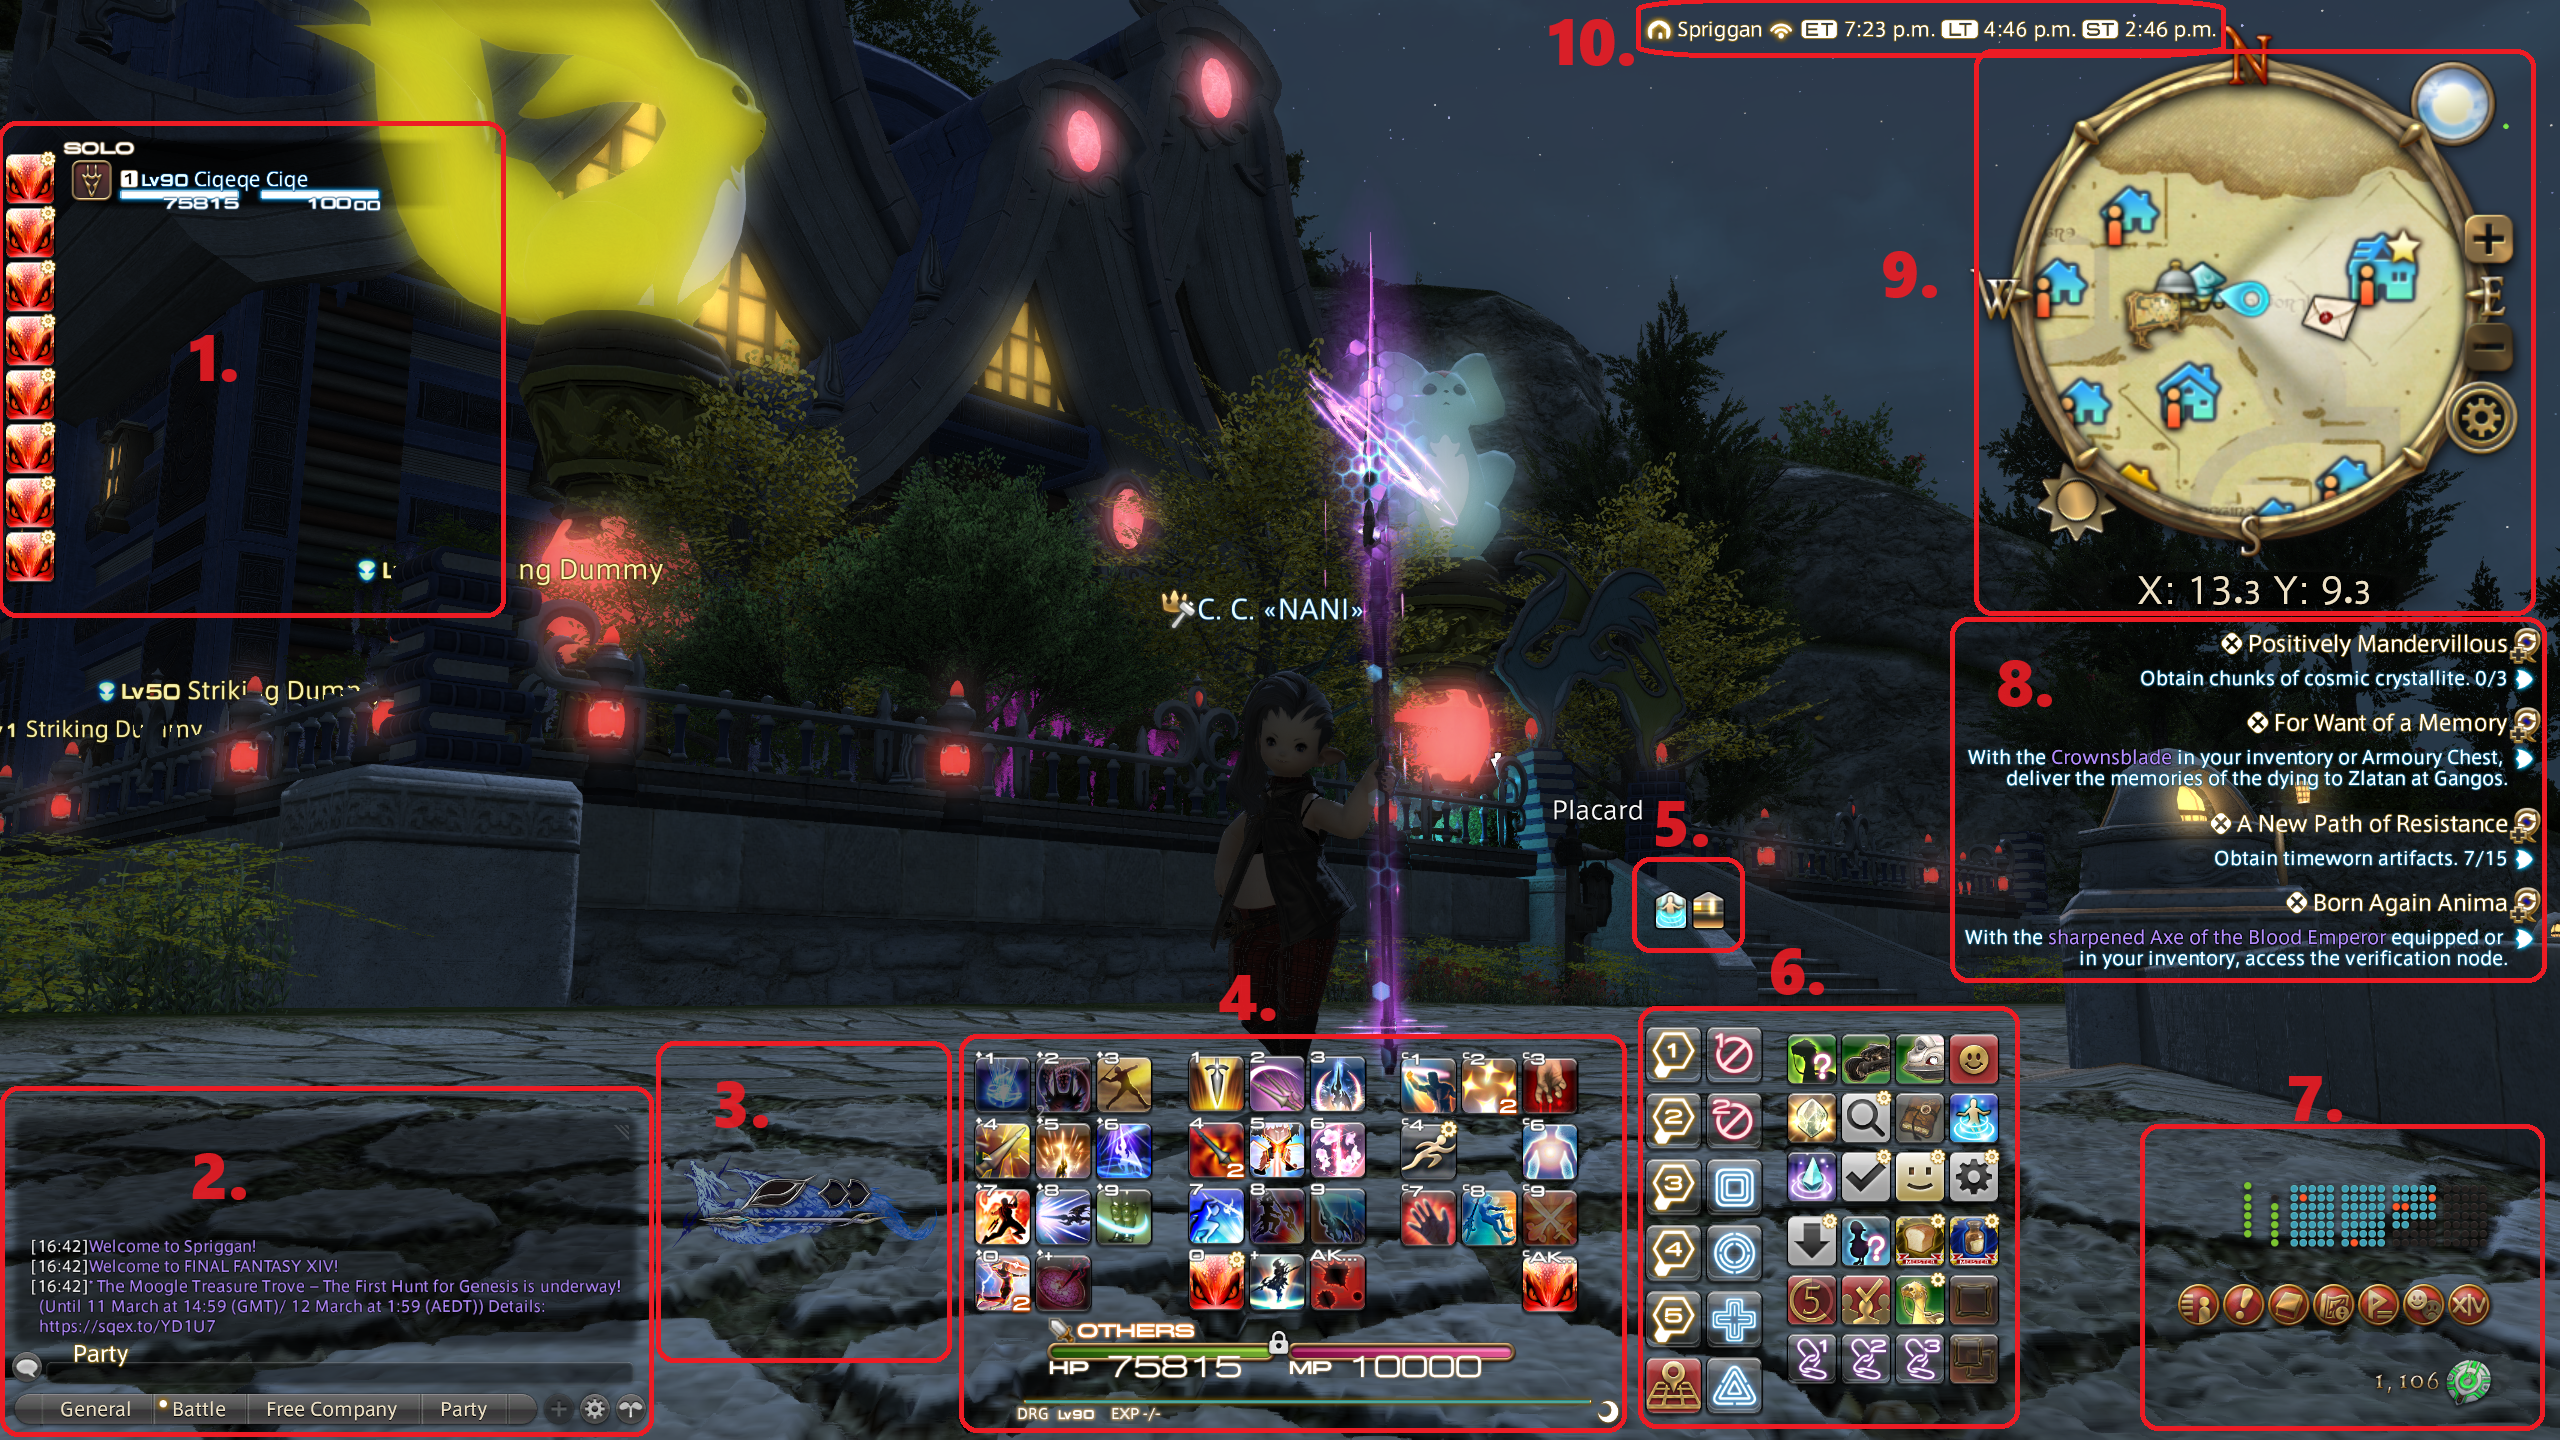
1. My party list is pretty much in the default position. If I mained a healer, I might bring it closer to the middle, but alas, I don't, I main summoner. I've turned on the option to show party list even when solo in order to see shields on myself when doing harder solo content. I've also put one job-specific hotbar here. It is aligned with the spacing of the party list, so I can put target-specific macros here. In this example for DRG, I simply have a focus target macro next to each party member, the macro just setting that person as my focus target, because I have a macro for Dragon Sight to target my focus target. In effect, I choose a "dance partner" for my Left Eye. More on the macros later. On crafters, I keep various crafting macros on this hotbar.
2. The chatbox is also pretty much default in its positioning. However, I've bound Alt+Enter to Log Window Zoom, which brings the chat to cover pretty much the entire screen if I have to examine chat history. My chat defaults to party, but you can temporarily overwrite it with
I think those binds are default, but you can check/edit them in Keybinds → Chat for yourself. For the chat logs tabs, General contains pretty much everything except battle (system) messages. Battle contains only Battle messages. Free Company contains free company chat, tells, CWLS messages, and Free Company announcements. The idea is that if I've AFK'd, I can catch up on any actual messages to me in this tab. Finally, Party contains party chat, alliance chat, shout chat, yell chat, say chat, and NPC dialogue. The idea is to only have relevant messages to the battle content at hand.
3. This space is where the job gauges go. I usually prefer the ornate versions, but this is just personal preference. Please note that the game has an outstanding bug where job gauges keep resetting to their default positions under certain conditions. Read more here.
4. These are the main job-specific hotbars. Every job fits into three hotbars, so that's what I have. I'll explain these in more detail later. The HP and MP/GP/CP bars as well as the exp bar are pretty much in the default position, although I've tightened the spacing to the bottom edge of the screen a bit.
5. I've split my "status info" HUD element into three components: enhancements, enfeeblements, and others. These are the "others", so here I can see my active FC buffs and food buffs. I'll cover the enhancements and enfeeblements later when I show a battle screenshot.
6. These hotbars are "shared", so they don't change when I change jobs. The first hotbar is 2 × 6 and has most of the various target marks, as well as a button to access the waymarks menu. The second and third hotbars are two 4 × 3 hotbars stacked together and have the following things:
7. The aforementioned Inventory Grid as well as the Main Menu and the Gil HUD elements are pretty much in their default positions as well, although I've tightened the spacing here a bit as well. You can select which currencies are shown in the Gil HUD element in the Currency Settings menu which can be accessed from the Currency window by clicking the cogwheel. Right-clicking the HUD element cycles through the selected currencies. For me at the moment, quickly seeing how many tomestones od Causality is much more relevant than my gil amount (which I can see in my inventory anyways).
8. Duty List, i.e. ongoing quests. Pretty much default. You can hide ongoing quests from this list in the journal, as well as pin quest to it – other than that, it shows the 5 most recently accepted quests.
9. Minimap. I like my minimap as big as I can make it and as zoomed-out as I can make it.
10. Server info and clocks. You can enable/disable the three different clocks (Eorzea time, Local time, and Server time) in Character Configuration → UI Settings → HUD. I like to have all three of them. By the way, if you hover over the "Wi-Fi" icon, it shows you the packages the game is currently sending and receiving.
What's not in the picture is the Scenario Guide, because I've set it to vanish when I've caught up with the MSQ (Character Configuration → UI Settings → HUD → Character Information → Display Main Scenario Guide → Hide when all quests complete). For when it is there, it is in the default position in the top left corner.
For the HUD elements that are combat-specific, I have the following screenshot from battle:
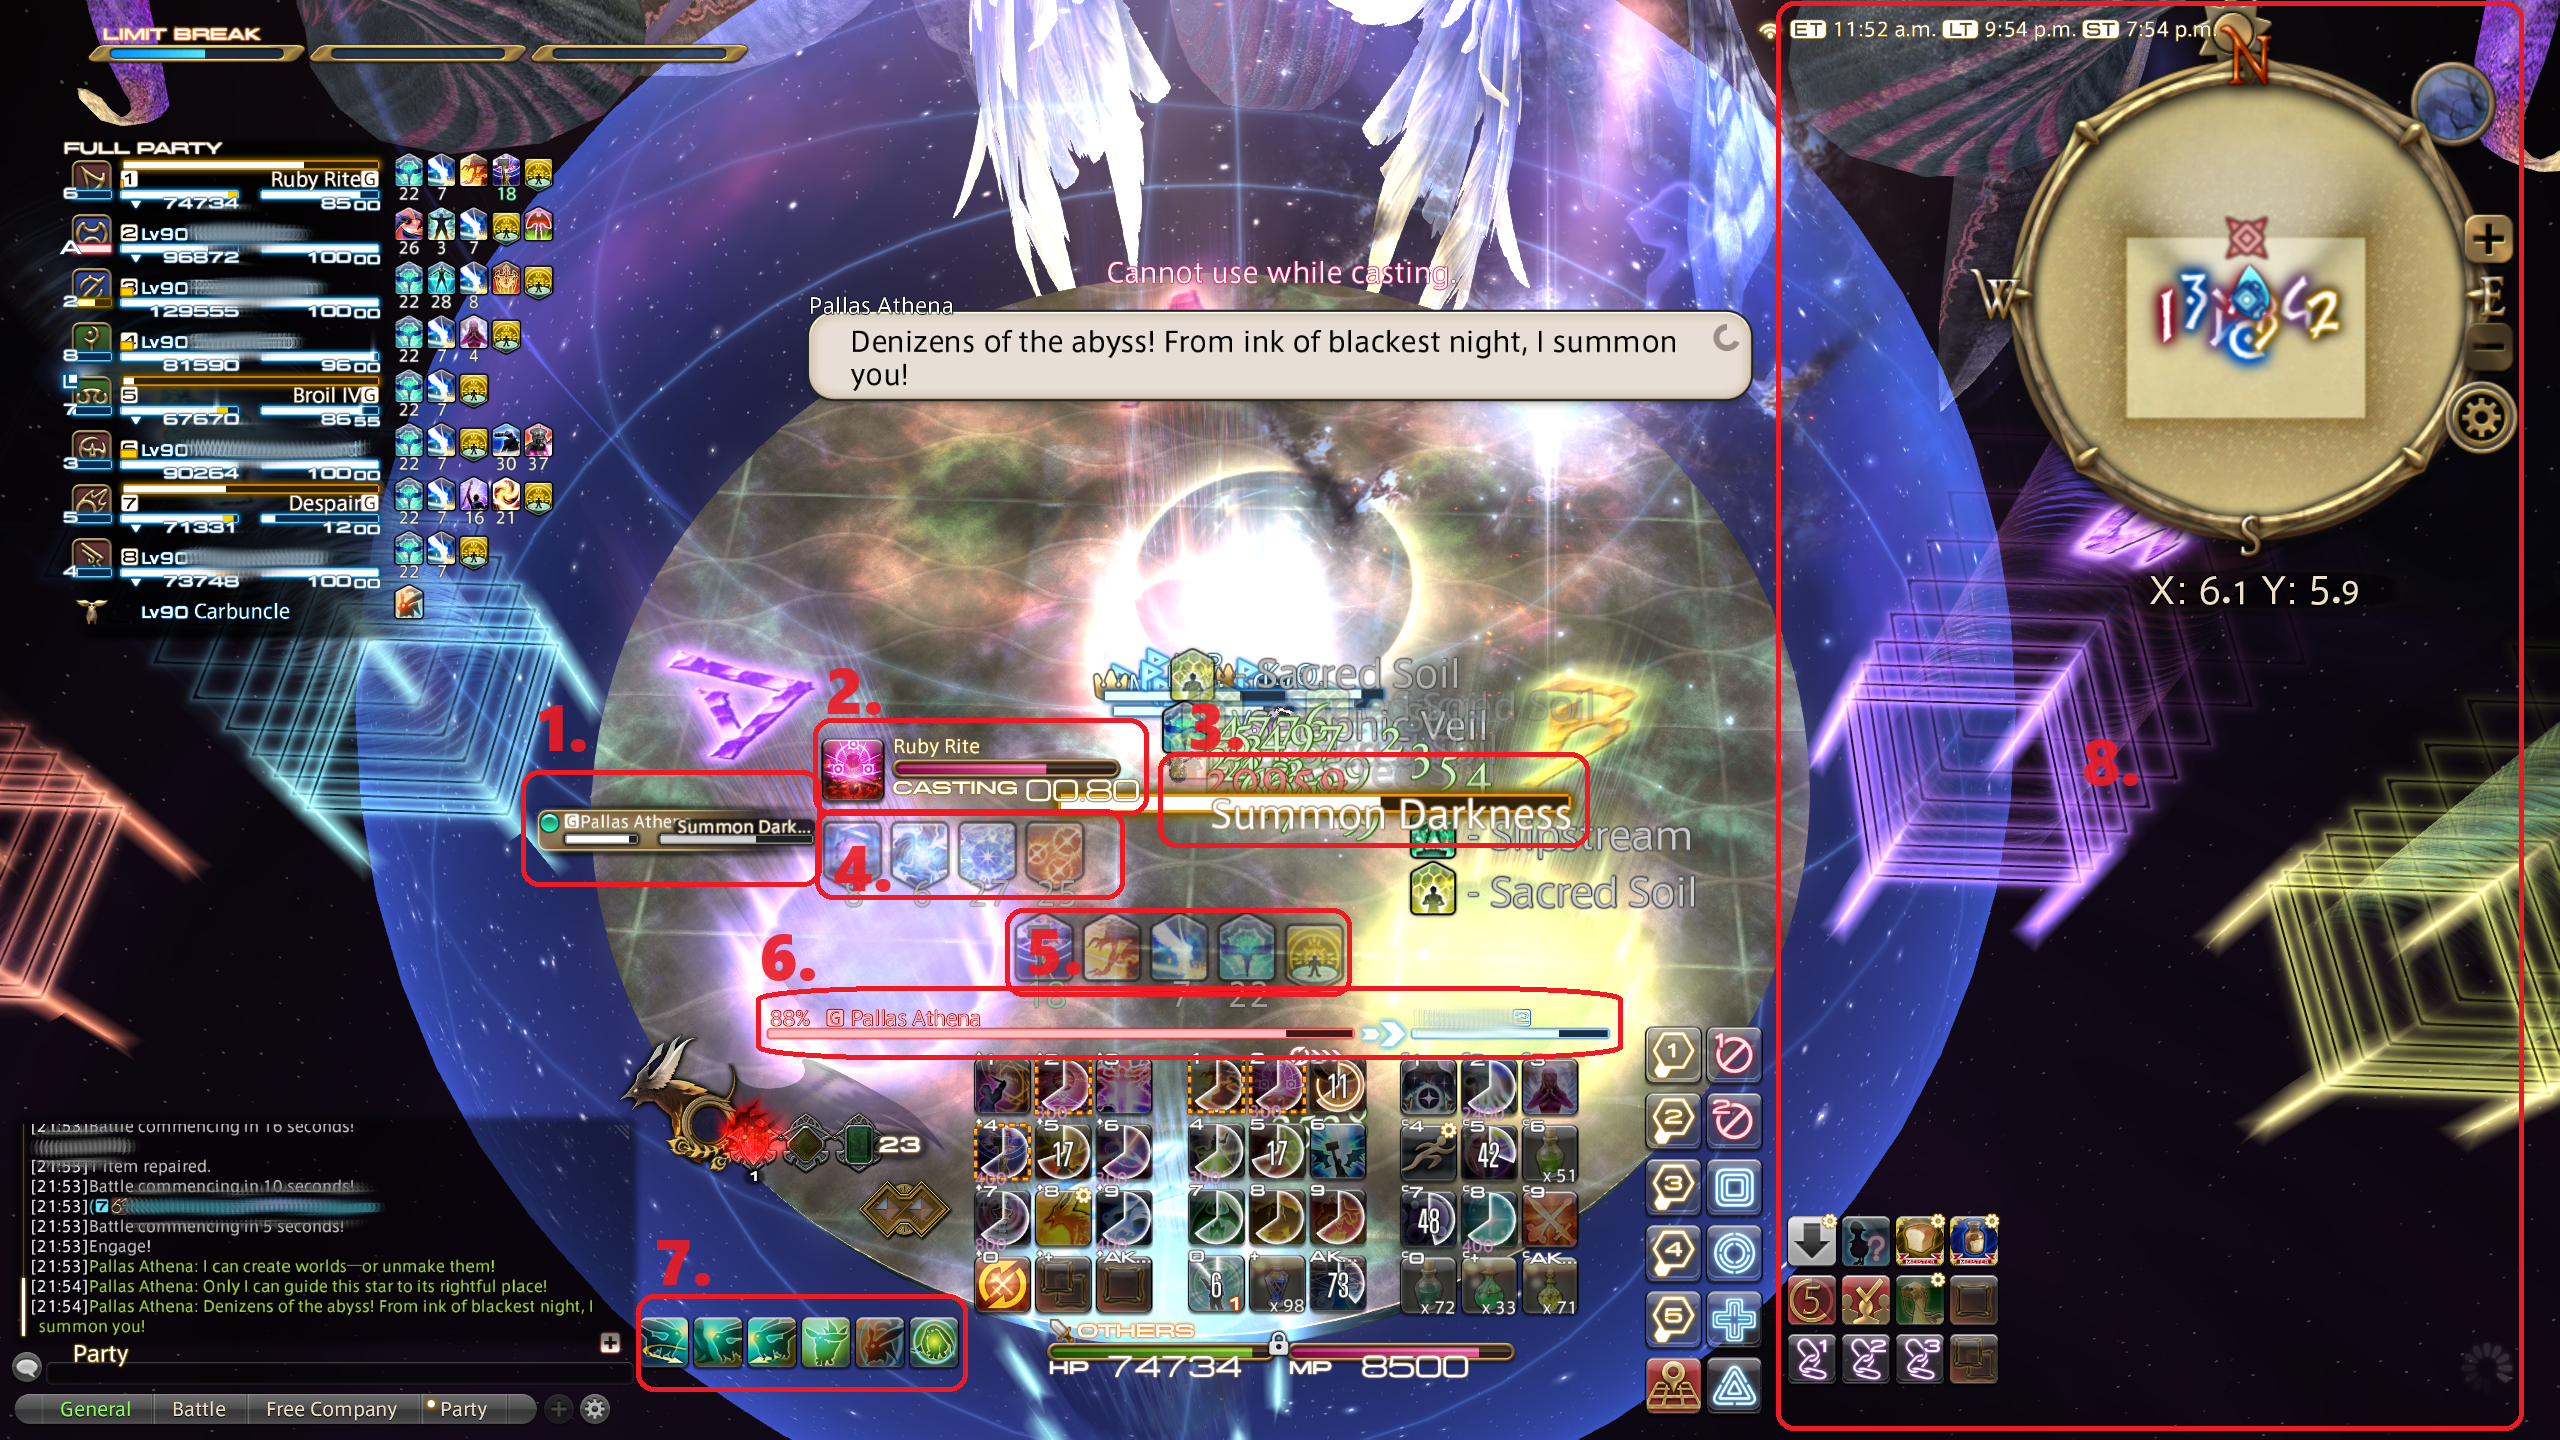
1. Enemy List – I keep this close to the center so that it's easier to see.
2. Progress Bar, i.e. your own cast bar – central and easy to see
3. Target Ingo (Progress Bar), i.e. the boss's cast bar. Unlike the default settings, I like this in the center and big (I have it on 180%). It is crucial to see the cast names and to see, e.g. if a cast is interruptable (flashing red).
4. Target Info (status), i.e. the boss's buffs and debuffs. These are essential information as well, so in my opinion, the tiny ones in the default HUD just aren't clear enough. These are 180% and a bit transparent, so I can see AOE telegraphs through them if necessary.
5. Status Info (Enhancements) and Status Info (Enfeeblements). I keep my own buffs and debuffs very big and very central. The split between them is at the horizontal middle point of the screen, and the buffs are on the left and right-justified 10×2, while the debuffs are on the right and left-justified 10×2. This makes the buffs and debuffs one continuous line where the debuffs (that you often need to quickly identify) are at the end. As with the boss's buffs/debuffs above, these are also 180% and transparent.
6. Target Info (HP). I've enabled the setting to show the target's remaining HP percentage (Character Configuration → UI Settings → HUD → Targets → Display target's remaining HP percentage). You can also see from the auto-attack symbol below the HP bar whether you're auto-attacking the boss at a given moment.
7. Pet Hotbar resides here.
8. Most of the non-battle-relevant stuff from the previous screenshot is gone, because I've clicked the button to hide them (on the upper left corner of the rightmost hotbar visible). The macro toggles the stuff on and off, and also sets Summoner petsize to small so that Titan's buttcheeks don't inhibit visibility. The macro is as follows:
/hud "Duty List" [off]
/hud "Gil" [off]
/hud "Main Menu" [off]
/hud "Inventory Grid" [off]
/hud "Experience Bar" [off]
/hud "Scenario Guide" [off]
/hud "Hotbar 4" [off]
/hud "Hotbar 9" [off]
/hud "Hotbar 7" [off]
/hud "Status Info (Other)" [off]
/petsize all small
The macro syntax doesn't differentiate between "[on]", "[on/off]", and "[off]" – the macro just says "off" to state the intent of the macro to the reader.
I use a Logitech G600 MMO mouse. I've written more about that here. The main control scheme is as follows:
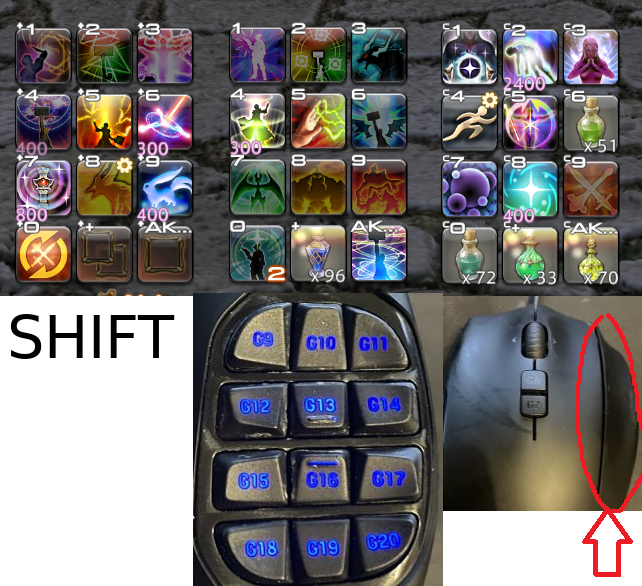
The main hotbar is the middle one. From the game's perspective, the keybinds are the default 1–9, 0, +, and AKUUTTIAKSENTTI (acute accent, which is the key between + and backspace on a Finnish keyboard). However, those keys are bound to the thumb buttons G9–G20 on the mouse so that the thumb button grid matches with the 3 × 4 grid of the hotbar. The hotbar 2 to the left of the middle one has the shift key as its modifier. I keep my left pinky on the shift key at all times during battle. The hotbar 3 to the right of the middle one has Ctrl as its modifier. I've bound the ctrl key to the G-Shift button on the mouse as illustrated in the picture. I press it with my right ring finger. This way, I can keep my left hand very still during combat and move freely while using skills. The only keys apart from the shift and WASD (plus Q and E for strafe) on the keyboard that I ever press during combat are space for jumping (duh), Z for sheathing my weapon (e.g. for Pyretic), and Shift+T to target the person who's targeting me in PvP. Most of the other keys on the keyboard are bound to various shortcuts to various menus for out-of-combat quality of life.
The hotbars above are for SMN, which is my main. I keep the two most frequent spells – Ruin III (and its derivatives) and Gemshine – on buttons 2 and 4, since they're the easiest to reach. I strive to place main single-target stuff on the main hotbar, AOE stuff on the shift-modified hotbar, and role actions on the Ctrl-modified hotbar. Any buttons shared across jobs are always on the same buttons on each job.
Summoner has very few buttons, so there are a lot of stuff one couldn't normally fit onto the main bars, such as spine and echo drops and auto-attack (so that I can activate book smashing without needing to find my cursor), as well as duplicates of the Duty Actions I and II from earlier. (Having Duty Action I bound to a hotkey is important when doing criterion dungeons for the special resurrection.)
The button on Shift+8 is my Rekindle macro. The macro uses Rekindle (the Phoenix targeted oGCD heal) on my target's target, e.g. (usually and hopefully) the tank. The macro is as follows:
/merror off
/micon "Rekindle"
/ac "Astral Flow" <tt>
I use sprint with a macro as well, since Sprint doesn't queue like normal skills. The sprint macro is simply
/merror off
/micon "Sprint"
/ac "Sprint"
/ac "Sprint"
/ac "Sprint"
/ac "Sprint"
/ac "Sprint"
/ac "Sprint"
/ac "Sprint"
/ac "Sprint"
/ac "Sprint"
/ac "Sprint"
/ac "Sprint"
/ac "Sprint"
/ac "Sprint"
which simulates queuing. It still isn't very responsive, though… All in all, the repeated actions on macros are just something more experienced players have told me to do, but I've never seen any hard science on whether it actually makes any difference, so take it with a grain of salt.
As stated above, many of the buttons on my shared hotbars open up different menus. In action, it looks like this:
How this works is that I have one shared hotbar, hotbar 5 in my case, that is normally hidden. It is a 1 × 12 hotbar situated horizontally above the other hotbars, below the FC buffs. The different menus are stored in the various class hotbars. Remember the time you received your first soul crystal and your hotbars got all messed up? This menu system takes advantage of the design choice that the classes have separate hotbars from the jobs. For example, the main job selection menu in the gif above is stored in hotbar 2 of my Archer. The menu button simply copies the Archer hotbar 2 to the shared hotbar 5 and makes the shared hotbar visible:
/hotbar copy ARC 2 share 5
/hud "Hotbar 5" [on/off]
If you have leveled all the classes to at least level 30 and received the soul crystals, you have (9 classes × the number of job-specific hotbars you have) room for different submenus. Just copy the relevant class hotbar to the shared hotbar you've dedicated for the menu system. Just remeber to keep a main hand the underlying class can equip available so that you can edit the hotbars if necessary! I have the following menus built and still have a lot of room left:
I don't keep a completely separate PvP HUD like some people, but due to all the hotbars changing to PvP specific ones, the HUD still ends up looking a bit different:
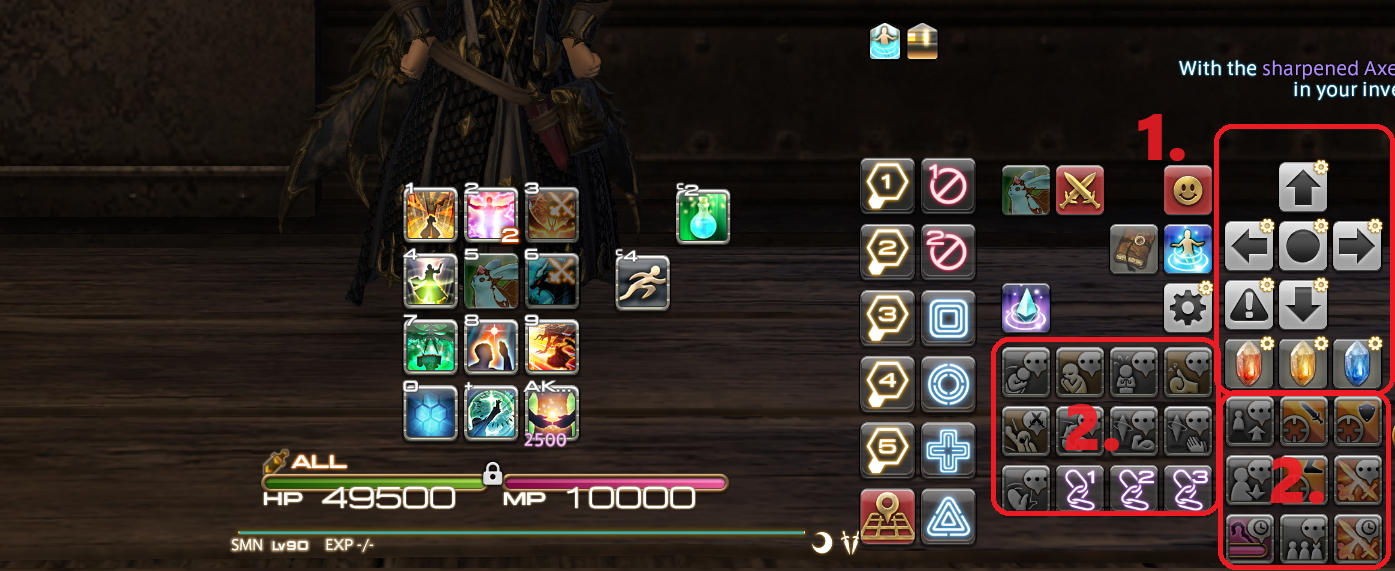
Once again, the example is SMN, since it's my main also in PvP. In PvP, pretty much all jobs fit into one hotbar, with just the potion and sprint spilling over.
1. These are communication macros for Frontline. I can post directions to alliance chat with a single button, directing the alliance to go N/S/E/W, mid, or base and to focus any of the other alliances based on color. To be honest, I don't have the stones to actually start directing random players. But the option is there…
2. I've retained the target markings from PvE. Additionally, I've put the Crystalline Conflict canned chat messages here.
Here's the "Individual" sheet of my macros. The "individual" means that these macros are specific to this character, whereas the "Shared" ones are shared across all characters on the same account. I don't differentiate between the tabs, since I only really play on one character.
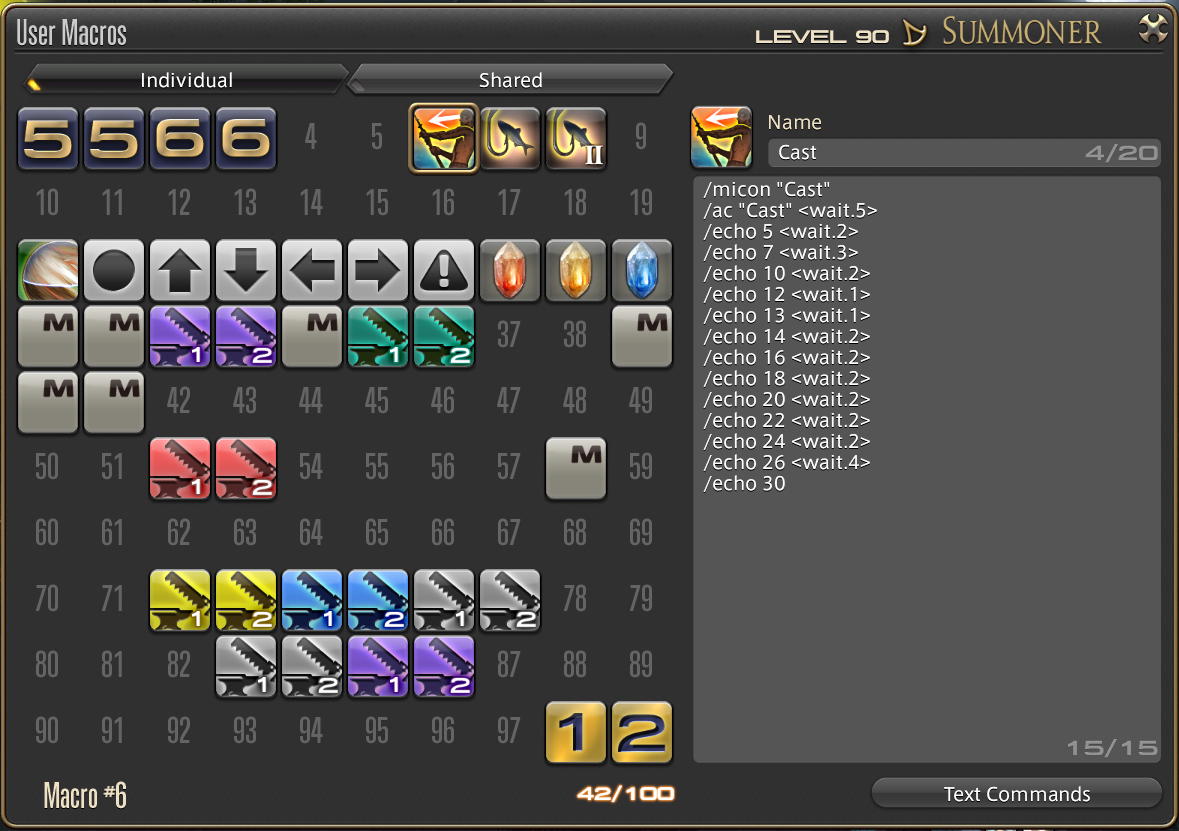
The first four macros are just raid macros I don't feel the need to share here. The macro on number 6 is my FSH cast macro. It is visible in the picture, but here's a copypasteable version:
/micon "Cast"
/ac "Cast" <wait.5>
/echo 5 <wait.2>
/echo 7 <wait.3>
/echo 10 <wait.2>
/echo 12 <wait.1>
/echo 13 <wait.1>
/echo 14 <wait.2>
/echo 16 <wait.2>
/echo 18 <wait.2>
/echo 20 <wait.2>
/echo 22 <wait.2>
/echo 24 <wait.2>
/echo 26 <wait.4>
/echo 30
The macros number 7 and 8 are just the same cast macro but for actions Mooch and Mooch II, respectively. Just change the ac name and the micon.
Macro 20 is just a gearset change to my Eureka SMN gearset. It is a macro simply because I wanted the Demi-Ozma as the gearset icon.
Macros 21–29 are the aforementioned PvP communication macros. Let's take the first as an example, and the idea should become clear:
/a Middle
That's it. That's the macro. It just posts a pre-set message to the alliance chat. The rest of them are similar.
The rest of the macros on this sheet are just various crafting macros that are always in flux. Make your own! Moving onto the "Shared" tab:
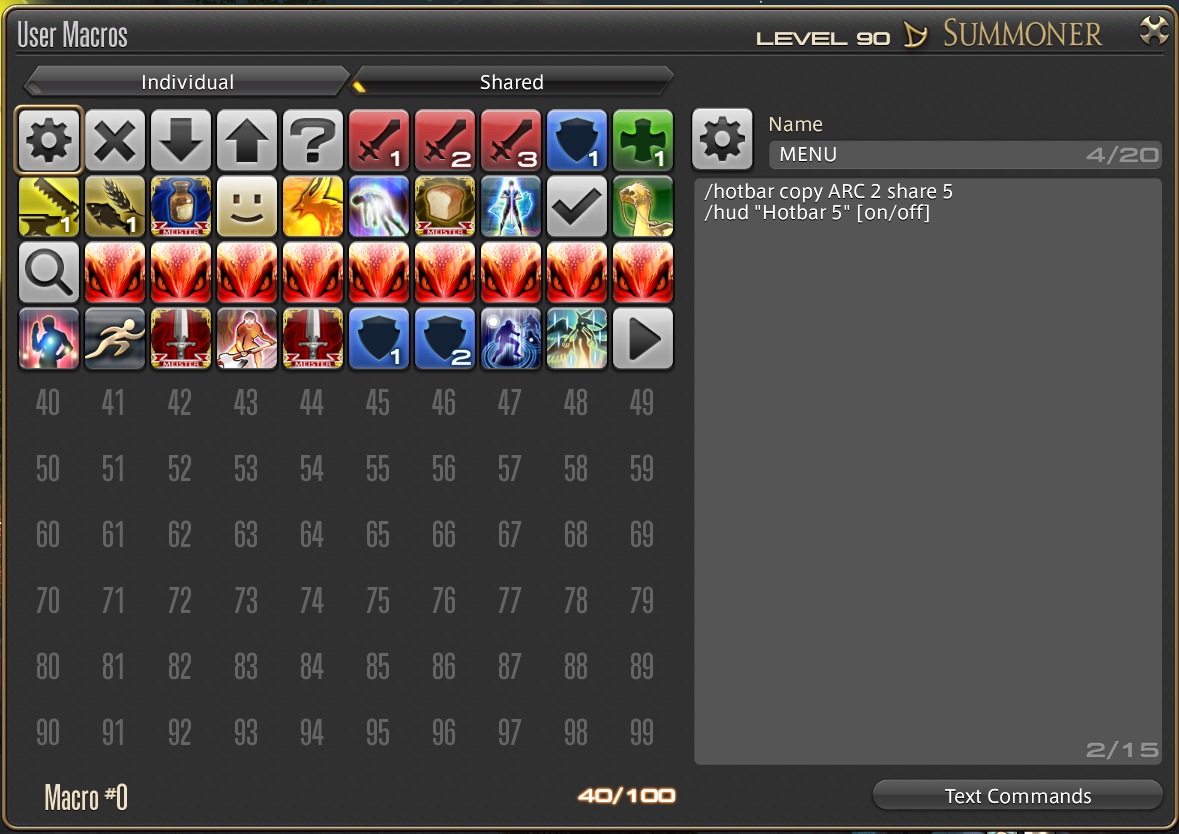
Here, the macros 0–13 (yes, I just realized the macros are zero-indexed) are all to do with the menu system explained above. Macro 14 is the Rekindle macro I also already explained in the SMN hotbar section.
Macro 15 is a Resurrection macro I don't use, but it might be useful to someone, so here goes:
/merror off
/micon "Resurrection"
/ac "Resurrection" <wait.1>
/p <se.1> Resurrection on <t>
The macro just casts the Resurrection spell (ACN, SMN, SCH) on your current target and posts a notification about it to the party chat with a sound effect to (hopefully) prevent another raiser wasting their swiftcast on it. I personally find raise macros a bit obnoxious so I haven't really used this one, ever.
Macro 16 is just the food menu button from the menu system. Macro 17, however, is a useful one. It is for BLM to Aetherially Manipulate to the target on which you are hovering your mouse cursor on (either on the field or in the party list, wherever you could target the target by clicking). The macro is as follows:
/merror off
/ac "Aetherial Manipulation" <mo>
/ac "Aetherial Manipulation" <mo>
/ac "Aetherial Manipulation" <mo>
/ac "Aetherial Manipulation" <mo>
/ac "Aetherial Manipulation" <mo>
/ac "Aetherial Manipulation" <mo>
/ac "Aetherial Manipulation" <mo>
/ac "Aetherial Manipulation" <mo>
/ac "Aetherial Manipulation" <mo>
/ac "Aetherial Manipulation" <mo>
/ac "Aetherial Manipulation" <mo>
/ac "Aetherial Manipulation" <mo>
/micon "Aetherial Manipulation
Macros 18–20 are again from the menu system. Macros 21–29 are the Dragon Sight "dance partner" macros mentioned at the start of this post. The eight that reside next to the party list on DRG just set the focus target to the person on that row of the party list, row 2 for example:
/merror off
/focustarget <2>
/micon "Dragon Sight" action
In turn, the one that goes to the actual combat hotbars casts Dragon Sight on the focus target:
/merror off
/micon "Dragon Sight" action
/ac "Dragon Sight" <f>
/ac "Dragon Sight" <f>
/ac "Dragon Sight" <f>
/ac "Dragon Sight" <f>
/ac "Dragon Sight" <f>
/ac "Dragon Sight" <f>
/ac "Dragon Sight" <f>
/ac "Dragon Sight" <6>
/ac "Dragon Sight" <6>
/ac "Dragon Sight" <4>
/ac "Dragon Sight" <4>
/ac "Dragon Sight" <1>
/ac "Dragon Sight" <1>
The macro has three fallbacks: If it fails to find a focus target, it first tries to cast the Dragon Sight on the person sixth in the party list. With my party list sorting options, the first row is always me, a DRG in this case. Rows 2 and 3 should be the two tanks in 8 player content. Rows 4 and 5 should be the two healers in 8 player content. Rows 6, 7, and 8 are the three other DPS players. I've ordered the jobs inside the role to have melee DPS jobs first, so the row 6 should therefore always be the other melee DPS, who in most cases should benefit most from the Left Eye buff. If that fails (for example due to you playing 4 player content), it then tries row 4, which should be the other DPS in a light party. Finally, if that fails, it casts it on yourself (row 1).
Macro 30 is my Shirk macro. It casts shirk on the second person in the party list, which, if you're playing tank, is always the other tank in 8 player content. The macro goes:
/merror off
/micon  "Shirk"
/ac "Shirk" <2>
/ac "Shirk" <2>
/ac "Shirk" <2>
/ac "Shirk" <2>
/ac "Shirk" <2>
/ac "Shirk" <2>
/ac "Shirk" <2>
/ac "Shirk" <2>
/ac "Shirk" <2>
/ac "Shirk" <2>
/ac "Shirk" <2>
/ac "Shirk" <2>
Macro 31 is the Sprint macro detailed earlier. Macro 32 is again for the menu system. Macro 33 is my WAR Holmgang macro that just casts it on yourself, making it safer than casting it on the boss (e.g. no range requirement):
/merror off
/ac "Holmgang" <me>
/ac "Holmgang" <me>
/ac "Holmgang" <me>
/ac "Holmgang" <me>
/ac "Holmgang" <me>
/ac "Holmgang" <me>
/ac "Holmgang" <me>
/ac "Holmgang" <me>
/ac "Holmgang" <me>
/ac "Holmgang" <me>
/ac "Holmgang" <me>
/ac "Holmgang" <me>
/ac "Holmgang" <me>
/micon "Holmgang"
Macro 34 is just a vanity macro to make my Cronus Lux glow when sheathed. Once the sit animation has started, you can move and the weapon stays glowy while being sheathed.
/draw
/wait .5
/sit
Macros 35 and 36 are just focus target macros for my healers to set the main tank as the focus target. The macro buttons reside in the hotbar next to the tanks in the party list. The second row, as exemplified below, applies for 4 player content and for 8 player content where the upper tank decides to be the main tank. The other one is just for row 3 when the lower tank is the main tank in 8 player content.
/focustarget <2>
Macro 37 is for the BLU spell Loom. The macro makes you loom to the center of your target's hitbox:
/merror off
/micon Loom blueaction
/blueaction Loom <t>
/blueaction Loom <t>
/blueaction Loom <t>
/blueaction Loom <t>
/blueaction Loom <t>
/blueaction Loom <t>
/blueaction Loom <t>
/blueaction Loom <t>
/blueaction Loom <t>
/blueaction Loom <t>
/blueaction Loom <t>
/blueaction Loom <t>
/blueaction Loom <t>
Macro 38 is also for BLU, this time for Feather Rain, which is a floor-targeted oGCD. The macro just places the puddle to the middle of your target's hitbox. This same logic could be used with all floor-targeted skills. Just replace "blueaction" with "ac" when dealing with regular skills.
/merror off
/micon "Feather Rain" blueaction
/blueaction "Feather Rain" <t>
/blueaction "Feather Rain" <t>
/blueaction "Feather Rain" <t>
/blueaction "Feather Rain" <t>
/blueaction "Feather Rain" <t>
/blueaction "Feather Rain" <t>
/blueaction "Feather Rain" <t>
/blueaction "Feather Rain" <t>
/blueaction "Feather Rain" <t>
/blueaction "Feather Rain" <t>
/blueaction "Feather Rain" <t>
/blueaction "Feather Rain" <t>
/blueaction "Feather Rain" <t>
Finally, the last macro is a combat macro for a8s on BLU. Under normal circumstances, one should never use combat macros like this due to massive uptime loss, but this was a very niche situation, and I have my Morbol to show for it.
/blueaction "Tingle" <wait.3>
/blueaction "Whistle" <wait.3>
/blueaction "Moon Flute" <wait.3>
/blueaction "Triple Trident" <wait.3>
/blueaction "Being Mortal" <wait.1>
/blueaction "Surpanakha" <wait.1>
/blueaction "Surpanakha" <wait.1>
/blueaction "Surpanakha" <wait.1>
/blueaction "Surpanakha" <wait.1>
/blueaction "Whistle" <wait.3>
/blueaction "Final Sting"
Even when one plays with a keyboard and a mouse, you can still bind controller controls to various keys. There are a couple of ways I've taken advantage of this. The first one is for traversing menus with numpad as if it were a controller:
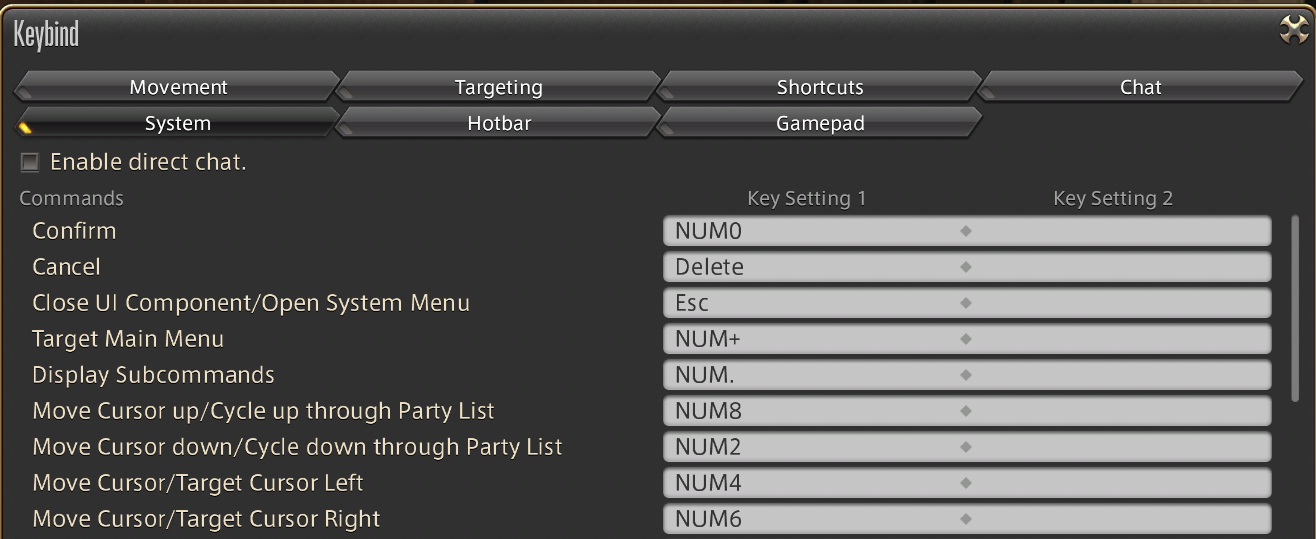
This allowed me to effectively spam the placard when the first-come-first-serve system was still in use. I won my first house with just numpad spamming. Having the confirm bound to a key is very useful. You can quickly start the interaction on nodes in Frontline, quickly enter the shifting sands in Cutter's Cry, quickly mass-turn-in Expert Deliveries to your Grand Company and so on… Having it on NUM0 makes the button quickly findable by your right thumb (albeit requiring you to take the hand off the mouse). Confirm and Display Subcommands are also used in housing, see this tutorial by Noa Saitoshii for additional information.
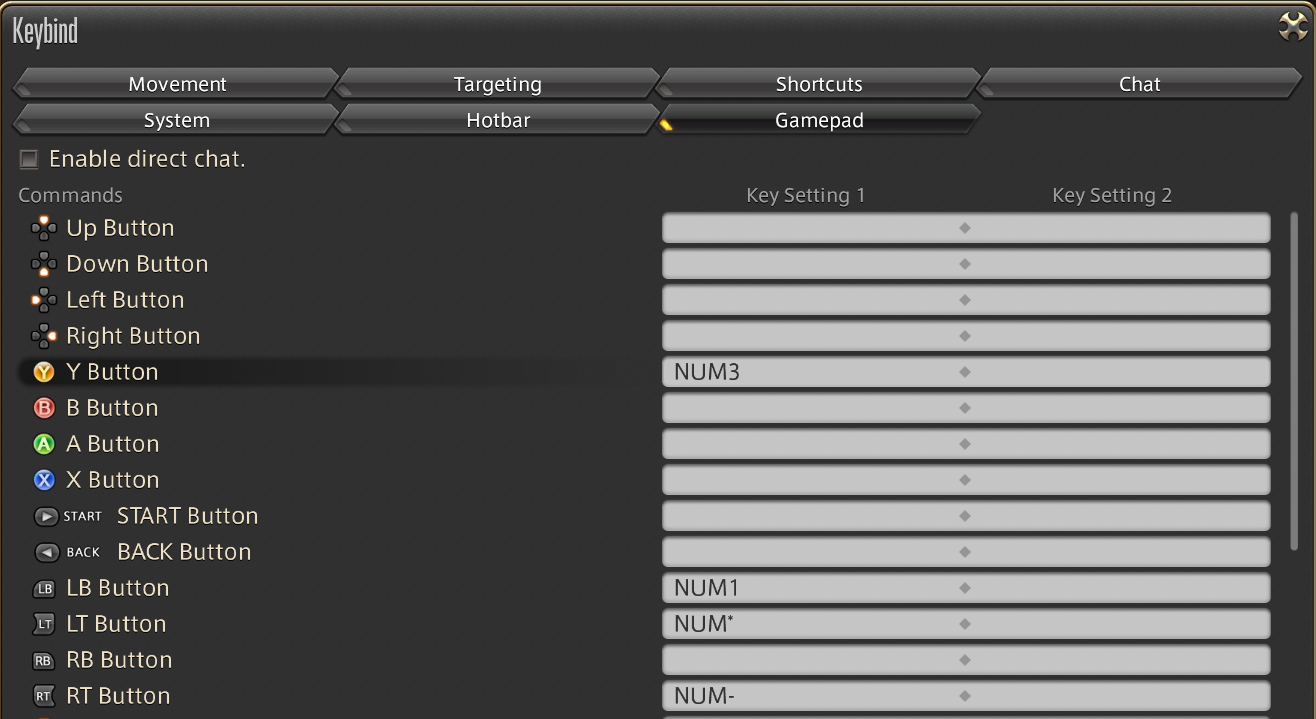
Here, binding the RT and LT buttons to NUM* and NUM- allows you to rotate furniture while placing it down in the Move mode, skipping the need to switch modes to rotate a piece of furniture. Binding the Y button to NUM3 in turn allows you to toggle Grid Snap on the fly.
I play in 1440p, full screen mode with G-Sync enabled. My frame rate is limited to 155 FPS in NVIDIA Control Panel. 155 FPS because it is a bit under the 165 Hz maximum refresh rate of my main monitor, and is about the maximum the pixel response time of the monitor can keep up with. More info here.